User manual
All features explained simply – step by step.
What is FloBudget?
FloBudget is a digital household book. It helps you keep track of your money – you can see at a glance how much you earn, how much you spend, and what you spend it on.
You don't need to be a finance expert. FloBudget works on computers, tablets, and smartphones and is designed so that anyone can use it right away.
Registration & Login
Create an account
Sign in with Google
On the login page you will also find the "Sign in with Google" button. This allows you to register and log in without your own password – FloBudget uses your existing Google account for this.
Forgot your password?
Click "Forgot password?" on the login page. You will then receive an email with a link that allows you to set a new password.
Try the Demo
Want to explore FloBudget without any commitment first? Click "View Demo" on the homepage. You will be logged in with a demo account filled with sample data – all features are available.
The Dashboard
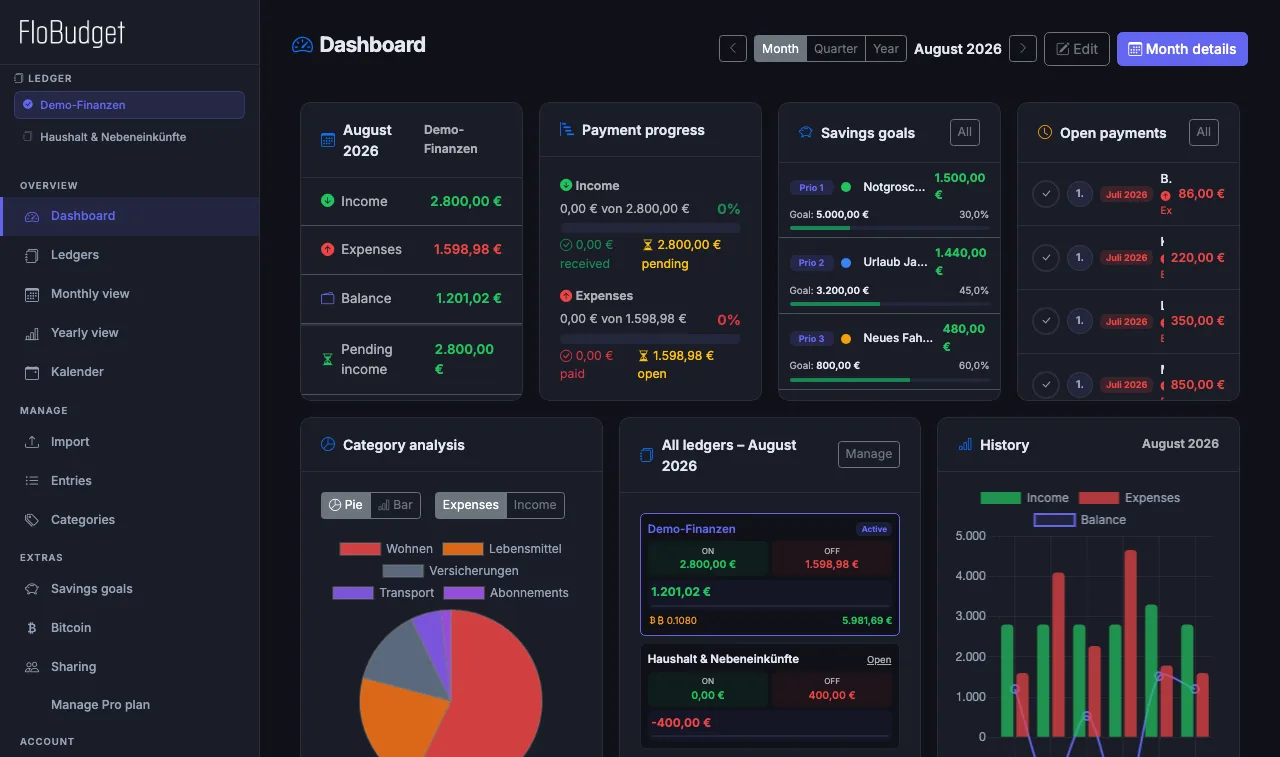
The dashboard is your personal financial overview. Here you can see at a glance how your finances are doing in the current period.
Available cards
- Income & Expenses – totals for the selected period
- Balance – what's left over (income minus expenses)
- Pending Payments – entries not yet marked as paid
- Savings Goals – progress bars for active goals
- Category Pie Chart – what you spend your money on
- Expense Bar Chart – comparison by category
- Monthly Trend – income & expenses over the past months as a chart
- Recurring Payments – overview of fixed income and expenses
- Bitcoin Portfolio – current value of your BTC entries (Pro)
Select a period
In the top right of the dashboard, choose between Month, Quarter, and Year. Use the arrow buttons to navigate forward and backward.
Customise dashboard Pro
Click "Edit" in the top right. You can then:
- Rearrange cards via drag & drop
- Show or hide individual cards
Then click "Save" to keep the arrangement.
Filter by account
If you have multiple accounts (finance books), the "Accounts" button appears in the dashboard header. Use it to choose which books are included in the aggregated totals – for example, only your personal and savings accounts, not your business account.
Recording Income & Expenses
Every payment you enter manually is called an "entry". This can be an expense (e.g. supermarket) or income (e.g. salary).
Add a new entry
Edit an entry
Click on an entry in the list to edit it. You can change all fields and save the changes.
Mark as paid / unpaid
Click the checkmark symbol next to an entry to mark it as "paid". Unpaid entries appear in the dashboard as a reminder and are highlighted separately in the overview.
Delete an entry
Open the entry via the edit symbol. In the dialog you will find a "Delete" button at the bottom left:
- One-time entries are deleted directly.
- Recurring entries – a dropdown appears with two options:
- "End from this month" – the payment stops from the current month; past entries are kept.
- "Delete completely" – removes all entries for this payment, including past ones.
Filter & Search
Use the filter bar above the table to filter entries by month, year, type (income/expense), or category.
Free plan limits
In the Free plan you can record up to 20 one-time entries per month. A counter in the dialog shows how many you have left. With the Pro plan there is no limit.
Recurring Payments
Payments that occur regularly – rent, electricity, Netflix, salary – are set up once. FloBudget then takes them into account automatically every month.
Set up a recurring payment
Frequencies
- Monthly – every month (e.g. rent)
- Bi-monthly – every two months
- Quarterly – every three months
- Half-yearly – every six months
- Annually – once per year (e.g. car insurance)
Delete a recurring payment
Click the bin icon in the management list. A dialog appears with two options:
- "End from this month" – the payment ends from the current month; all past entries are retained.
- "Delete completely" – deletes the payment entirely, including all past entries.
Order in the monthly view
In the monthly view, you can sort recurring entries by column: click a column header (e.g. "Due date" or "Amount") to sort the table ascending or descending. The arrow icon shows the active sort direction.
Free plan limit
In the Free plan, recurring payments are limited to a certain number. In the Pro plan there is no limit.
Monthly & Annual View
Monthly view
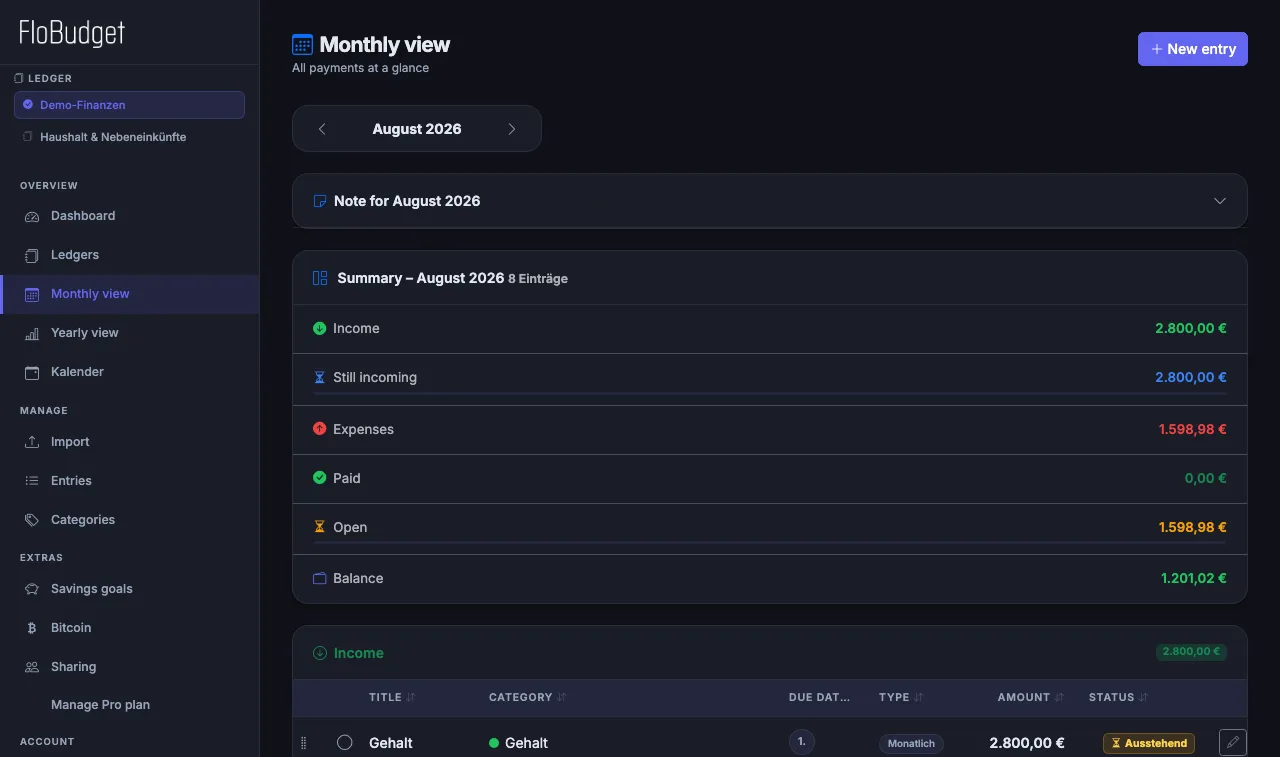
Under "Month" in the menu you can see all entries – one-time and recurring – for the selected month in a compact table. Use the arrow buttons to switch between months, or choose the month and year directly using the selection fields at the top.
Sort columns
Click a column header (e.g. "Due date", "Amount", or "Status") to sort the table ascending or descending. The arrow icon next to the column title shows the active sort direction.
Skip an individual month
Was a recurring payment suspended in a particular month? Open the entry in the monthly view and select "Skip this month only". The entry is omitted for that month; all other months remain unchanged.
Adjust amount for one month
Open a recurring entry in the monthly view. You can enter a different amount for that specific month without changing the base data of the payment.
Paid status in the monthly view
Each entry has a checkmark. Click it to mark the entry as paid for that month. The status is saved per month – so you can see at a glance what still needs to be done.
Annual view
Under "Year" you see a monthly summary for the entire year – income, expenses, and balance per month as a table and as a chart. This makes it easy to spot seasonal fluctuations and trends.
Calendar View
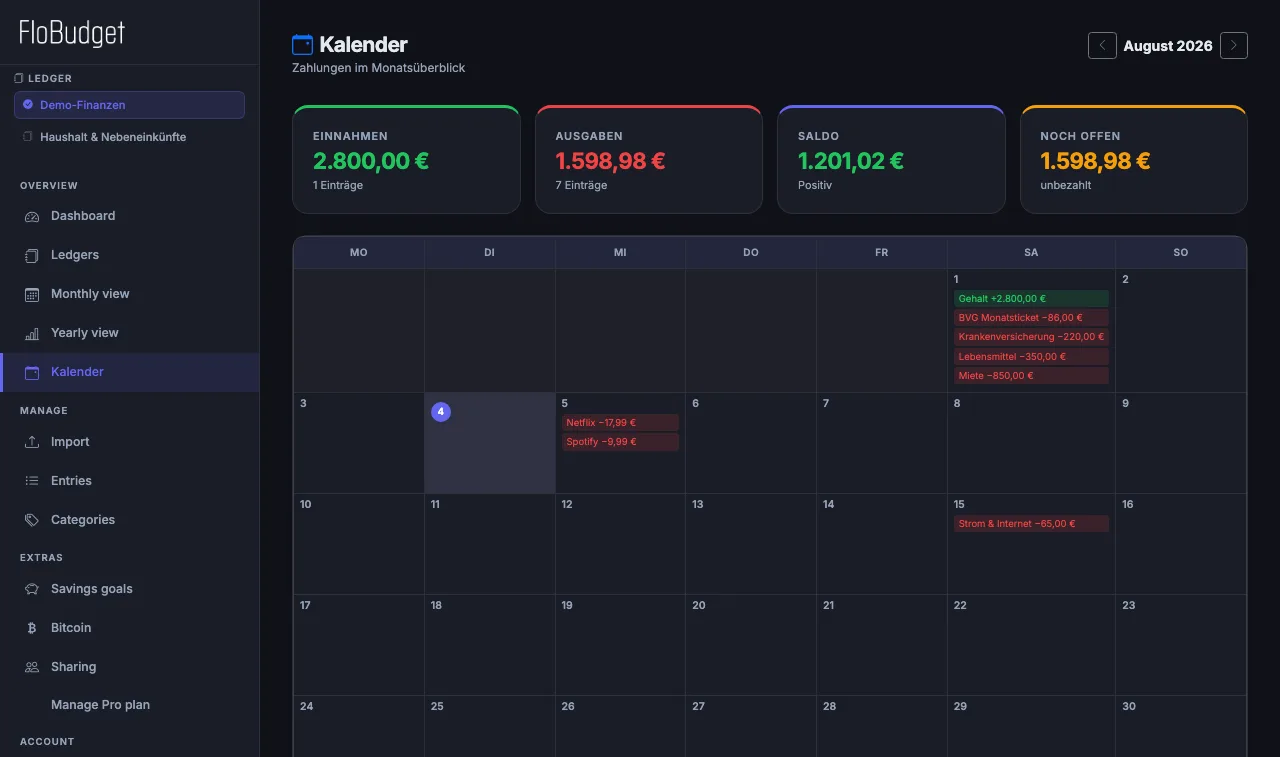
The calendar view shows all payments for the current month in a classic monthly calendar – precise to the day and at a glance. Accessible via "Calendar" in the menu.
Summary cards
Above the calendar, four key figures are shown for the selected month:
- Income – total income for the month
- Expenses – total expenses for the month
- Balance – income minus expenses
- Still open – amount of unpaid expenses
Calendar grid
The calendar shows a 7-column grid (Monday–Sunday). Each day displays the entries due on that day as colour-coded chips:
- Green – income
- Red – expenses
- Strikethrough & transparent – already marked as paid
Today is highlighted with a purple circle around the day number.
Navigation
Use the left and right arrow buttons to navigate between months. The "Today" button jumps directly back to the current month.
Recurring & one-time entries
The calendar includes both recurring payments (on the configured day of the month) and one-time entries (on their respective booking date).
Categories
Categories group your expenses and income – e.g. "Groceries", "Housing", "Transport", or "Salary". This makes your reports meaningful.
Create a category
Go to "Categories" in the menu and click "+ New Category". You can set the following:
- Name – freely selectable
- Type – income or expense
- Colour – shown in the chart
- Icon – symbol from the Bootstrap Icons library
Edit & delete a category
Click the pencil icon next to a category to edit it. When deleting, entries that were assigned to this category are not deleted – they simply lose their category assignment.
Limits in the Free plan
In the Free plan a maximum of 5 categories per finance book is possible. In the Pro plan there is no limit.
Savings Goals
Save towards concrete goals – a holiday, a new bike, an emergency fund. FloBudget shows you at any time how far along you are.
Create a savings goal
Record a deposit
Record an expense (e.g. "Holiday deposit") and select the savings goal as the category. FloBudget automatically counts these expenses as progress and updates the progress bar.
Status of a savings goal
- Active – goal is running and shown on the dashboard
- Reached – goal has been achieved; shown in the completed list
- Aborted – goal was abandoned
You can change the status at any time via the edit symbol or mark a goal as "Reached".
Multiple Finance Books
Finance books let you cleanly separate different areas of life – e.g. personal household, side income, or a small business.
Create a finance book
Go to "Management" in the menu and select the "Finance Books" tab. Click "+ New Finance Book" and give it a name.
Switch between books
In the sidebar or the dropdown at the top of the app you can see the active finance book. Click it to select a different book. All views – dashboard, entries, monthly view – then refer to the selected book.
Categories per book
Each finance book has its own categories. Categories from book A are not visible in book B.
Import Bank Statement (CSV)
Instead of entering every purchase by hand, you can upload your bank statement from online banking. FloBudget reads the transactions automatically.
CSV export at your bank
Almost all banks offer a CSV export. Here you can find the way for the most common banks:
| Bank | Where to export CSV? |
|---|---|
| DKB | Online banking → Account → Transactions → „Exportieren" → CSV |
| ING | Online banking → Account → Transactions → „Exportieren" → CSV |
| Sparkasse | Online banking → Transactions → „Exportieren" → CSV (semicolon-separated) |
| Volksbank / VR | Online banking → Account → Transactions → „Export" → CSV |
| Commerzbank | Online banking → Account → Transactions → „Herunterladen" → CSV |
| Postbank | Online banking → Account → Transactions → „Exportieren" → CSV |
| Deutsche Bank | Online banking → Account → Transactions → „Export" → CSV |
| N26 | Web app → Account → „Kontoauszug herunterladen" → CSV |
| Comdirect | Online banking → Account → Transactions → „Exportieren" → CSV |
| Revolut | App or web → Account → „Kontoauszug" → Format CSV → download |
| bunq | App → Account → „Exportieren" → CSV |
| Raiffeisen (AT) | Online banking → Account → Transactions → „Export" → CSV |
| PostFinance (CH) | E-Finance → Account → „Umsätze exportieren" → CSV |
Import CSV into FloBudget
Bitcoin Portfolio Pro
Do you hold Bitcoin? Enter your purchases and FloBudget shows you the current value of your portfolio at any time – automatically updated with the live price.
Add a Bitcoin entry
Go to "Management" in the menu and select the "Bitcoin" tab. Click "+ New Entry" and enter the date, BTC amount, and purchase price in euros.
What you see
- Total BTC amount from all entries
- Total amount invested in euros
- Current value based on the live price
- Gain/loss in absolute and percentage terms
The Bitcoin portfolio is also available as a card on the dashboard (Pro).
Sharing
Want to manage your household book together with your partner? Give the other person access to your account.
Set up sharing
Go to "Sharing" in the menu. Enter the username of the other person and choose whether they may only read or also edit.
Export Data (Backup)
You can download a complete backup of all your data as a ZIP file at any time – all finance books, categories, entries, savings goals, settings, and more.
Create a backup
What's in the backup?
finance_books.csv– all your finance bookscategories.csv– all categories of all bookswiederkehrende_zahlungen.csv– all recurring paymentseinmalige_zahlungen.csv– all one-time entriespayment_records.csv– monthly paid statusbitcoin_entries.csv– Bitcoin entries (if any)user_settings.csv– settings such as dashboard layoutexport_info.json– export metadata
Import Data
You can re-import a previously created backup (ZIP file) into FloBudget – for example after switching devices or when you want to transfer your data to a new account.
Import a backup
Import modes
Dashboard settings
During import you can optionally check the "Import dashboard layout" checkbox. This will also restore the arrangement of your dashboard cards.
GDPR Export (Access request under Art. 15)
Under the General Data Protection Regulation (GDPR) you have the right to receive all personal data stored about you in machine-readable form.
Request the export
Go to Settings → Data Export and click "Download GDPR disclosure". You will receive a file with all personal data that FloBudget has stored about you – including account, entry, and settings data.
Delete Account & Data
You can permanently and completely delete your FloBudget account at any time.
Delete account
What is deleted?
- Your user account and all login credentials
- All finance books, categories, and entries
- All settings and dashboard configurations
- All sharing permissions and bank connections
- All Bitcoin entries
Settings
Under "Settings" in the menu you manage your profile and all app-wide options.
Profile
- Change username
- Change email address
- Change password
Appearance
- Dark mode – ideal for evenings or low-light conditions
- Light mode – classic bright view
- Automatic – follows your device's system settings
Language
FloBudget is available in German, English, French, Spanish, Italian, Dutch and Polish. The language can be changed at any time in the settings.
Currency
Under Settings → Appearance → Currency you choose your display currency. Available options include Euro, US Dollar, British Pound, Swiss Franc, and the main national currencies of EU countries outside the eurozone (Swedish Krona, Norwegian Krone, Danish Krone, Polish Złoty, Czech Koruna, Hungarian Forint, Romanian Leu, Bulgarian Lev).
Your chosen currency is already asked for during registration, so FloBudget is set up correctly from the start.
Support
Do you have a problem or a question? Under Settings → Support you can send us a message directly.
Security & Two-Factor Authentication
Two-Factor Authentication (2FA / TOTP)
With 2FA enabled, in addition to your password you also need a 6-digit one-time code from an authenticator app when logging in. This protects your account even if your password falls into the wrong hands.
Passkeys – log in without a password
Passkeys are a modern alternative to passwords. You unlock your account with a fingerprint, face recognition, or device PIN. No password to type – and no password that can be stolen.
Go to Settings → Security → Passkeys to set up a passkey for your device.
Plan & Subscription
Free vs. Pro
- Up to 5 categories per book
- Up to 20 one-time entries/month
- Limited recurring payments
- 1 finance book
- Monthly & annual view
- Bank statement import
- Unlimited categories
- Unlimited entries
- Unlimited recurring payments
- Multiple finance books
- Customise dashboard (drag & drop)
- Bitcoin portfolio
- All future Pro features
Upgrade to Pro
Go to "Plan" in the menu or click the Pro banner in the app. Choose your plan and complete the subscription securely via Stripe. You are unlocked immediately.
Cancel
The subscription is monthly and can be cancelled at any time. Go to Settings → Plan and click "Cancel subscription". You retain Pro access until the end of the paid period.
Privacy
- All data is transmitted encrypted (HTTPS/TLS).
- Passwords are stored exclusively as a secure hash – never in plain text.
- Your data is stored on servers within the EU.
- No tracking, no advertising, no sharing with third parties.
- You can export your data or delete your account at any time.
- FloBudget stores no banking credentials for your bank.
All legal details: Privacy Policy · Terms of Service · Imprint